
견고한 서비스를 위해서는 TDD를 하거나 최소한 테스트 코드를 작성해야 합니다
📌 TDD (Test Driven Development) 방법론과 테스트 기법의 종류
스프링 부트에서 단위테스트 코드를 작성하는 법을 배워봅시다!
현재 스프링 구조를 잘 파악하고 있지는 못하여
교재와 구글링을 통해 습득한 지식으로 간단한 테스트만 진행합니다
스프링 프레임워크에 익숙해진 후에 한번 더 테스트 코드 작성에 대한 글을 쓰겠습니다 👊
이번 글은 저처럼 간단한 테스트 코드를 체험해보시고 싶은 분들만 참고하세요 😉
xUnit
- 테스트 코드 작성을 도와주는 프레임워크
- 개발환경(x)에 따라 Unit 테스트를 도와주는 도구
- 대표적인 xUnit 프레임워크들
* JUnit - Java
* DBUnit - DB
* CppUnit - C++
* NUnit - .net
- 이 중에서 자바용인 JUnit을 사용하겠습니다 🙌
메인 클래스 들여다보기
src > main > java > 그룹명.프로젝트명 > 프로젝트명Application
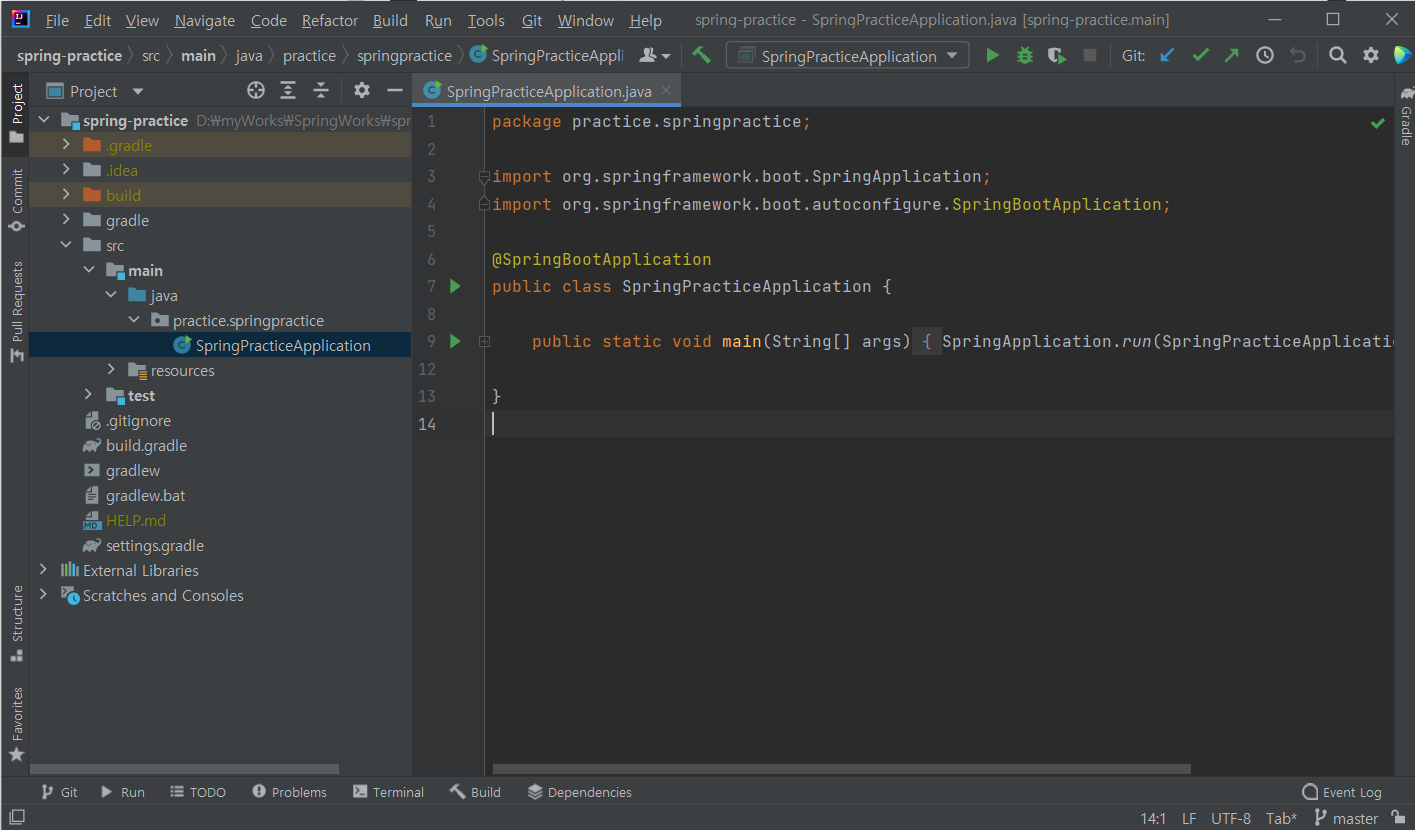
package practice.springpractice;

import org.springframework.boot.SpringApplication;
import org.springframework.boot.autoconfigure.SpringBootApplication;

@SpringBootApplication
public class SpringPracticeApplication {

	public static void main(String[] args) {
		SpringApplication.run(SpringPracticeApplication.class, args);
	}

}
@SpringBootApplication
- 스프링 부트의 자동 설정, 스프링 Bean 읽기와 생성을 모두 자동으로 설정한다
- @SpringBootApplication이 있는 위치부터 설정을 읽기 때문에, 이 클래스는 항상 프로젝트 최상단에 위치해야 한다
main 메소드에서 실행하는 SpringApplication.run
- 내장 WAS (Web Application Server; 웹 애플리케이션 서버) 를 실행한다
☝ 내장 WAS
별도로 외부 WAS를 두지 않고 애플리케이션을 실행할 때 내부에서 WAS를 실행하는 것
항상 서버에 톰캣을 설치할 필요 없이, 스프링 부트로 만들어진 Jar 파일 (실행 가능한 Java 패키징 파일)로 실행할 수 있다
내장 WAS를 사용하면, 언제 어디서나 같은 환경에서 스프링 부트를 배포할 수 있다
외부 WAS를 사용한다면 모든 서버에서 같은 WAS 환경을 구축하고 유지해야 하는 문제가 있기 때문에 내장 WAS를 권장한다
테스트 코드 작성해보기
> 테스트할 컨트롤러 만들기
1. 현재 프로젝트로 패키지를 하나 생성
Java 디렉토리 우클릭 > New > Package
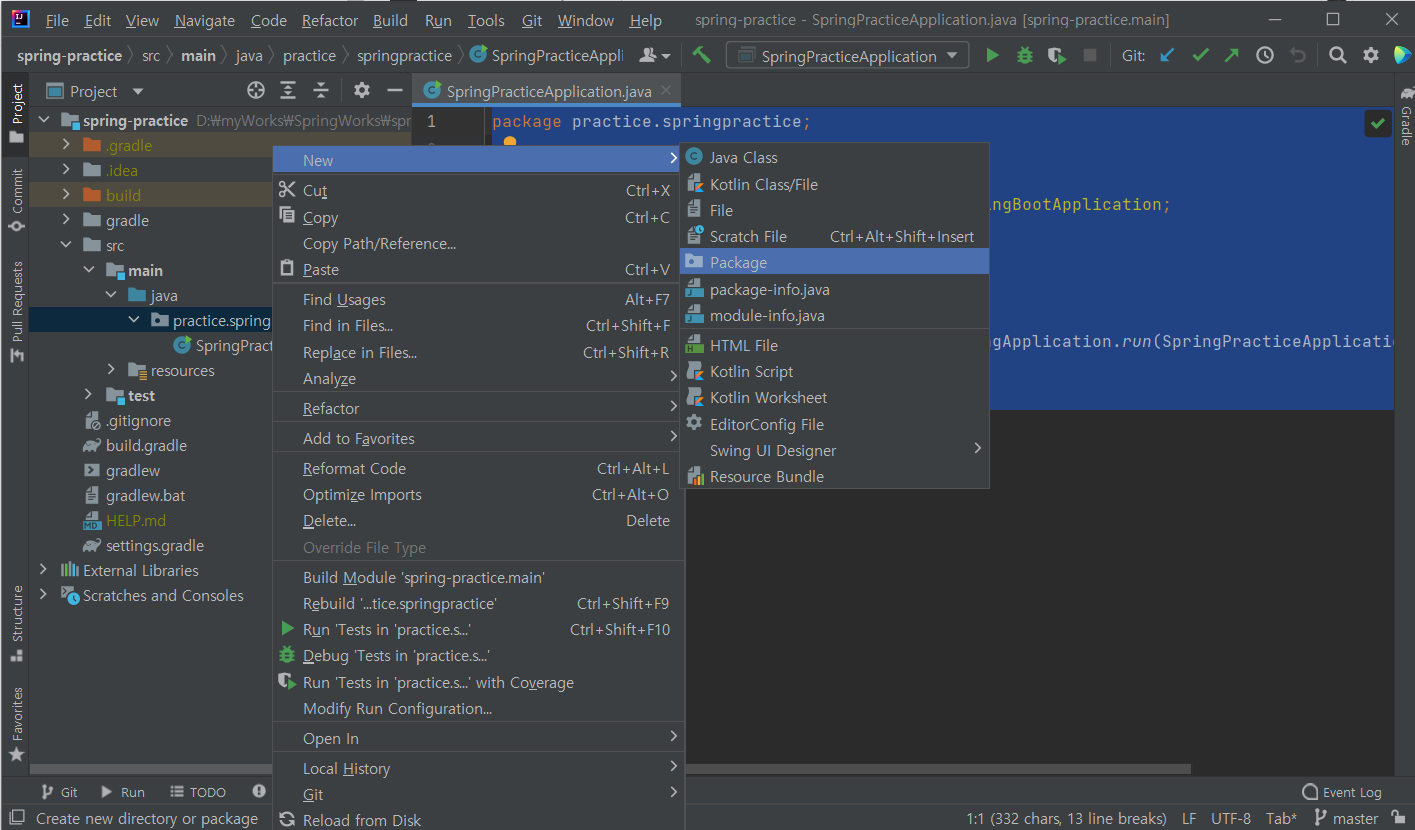
☝ 일반적으로 패키지명은 웹 사이트 주소의 역순으로 합니다
ex) codesyun.tistory.com 사이트라면 패키지명은 com.tistory.codesyun
2. 패키지에 Java 클래스를 생성한다

클래스 이름은 helloController로 했습니다
3. 다음과 같이 간단한 API를 만든다
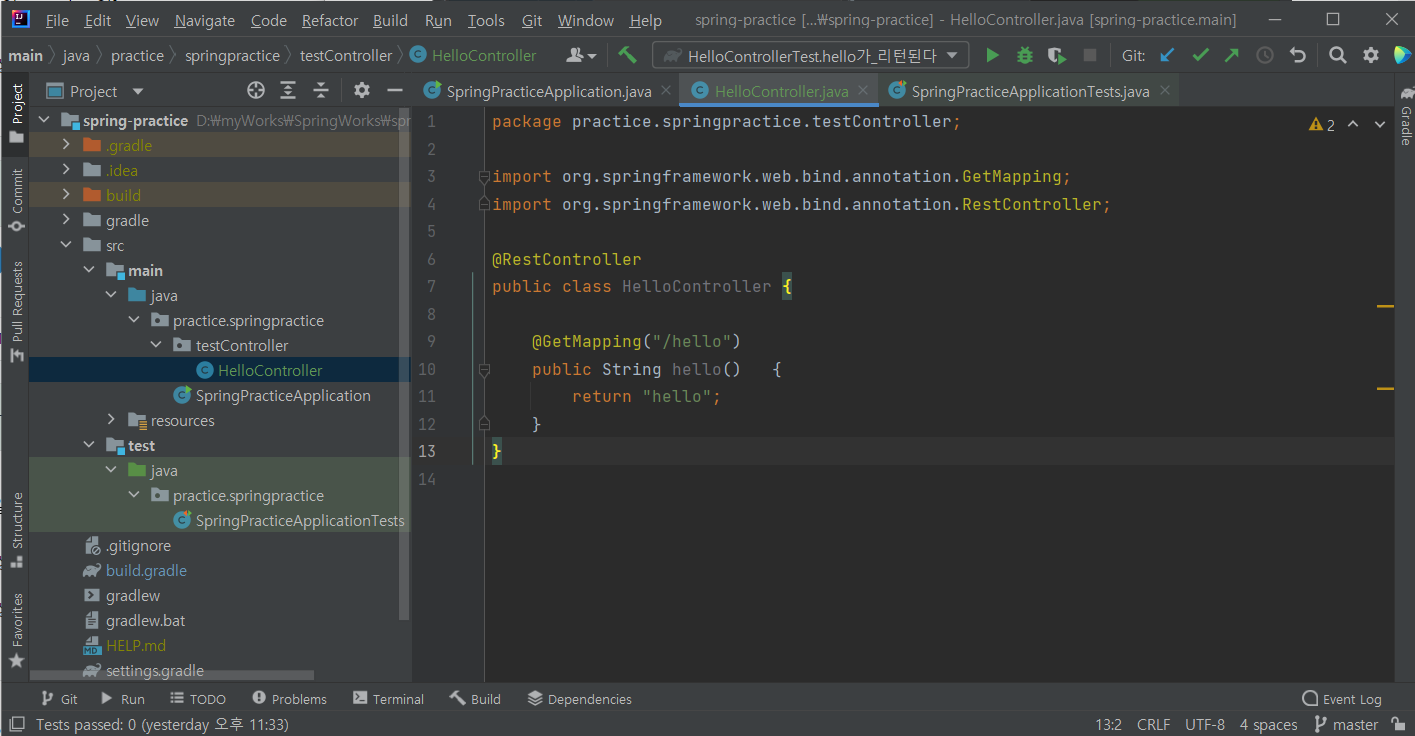
package practice.springpractice.testController;

import org.springframework.web.bind.annotation.GetMapping;
import org.springframework.web.bind.annotation.RestController;

@RestController
public class HelloController {

    @GetMapping("/hello")
    public String hello()   {
        return "hello";
    }
}
@RestController👉 JSON을 반환하는 컨트롤러로 만들어준다
@GetMapping👉 HTTP Method인 Get 요청을 받을 수 있는 API를 만들어준다
👉 이제 이 프로젝트는 /hello로 요청이 오면 문자열 hello를 반환하는 기능을 가지게 되었다!
> 테스트 코드로 검증해보기
WAS를 실행하지 않고, 테스트 코드로 검증할 것이다
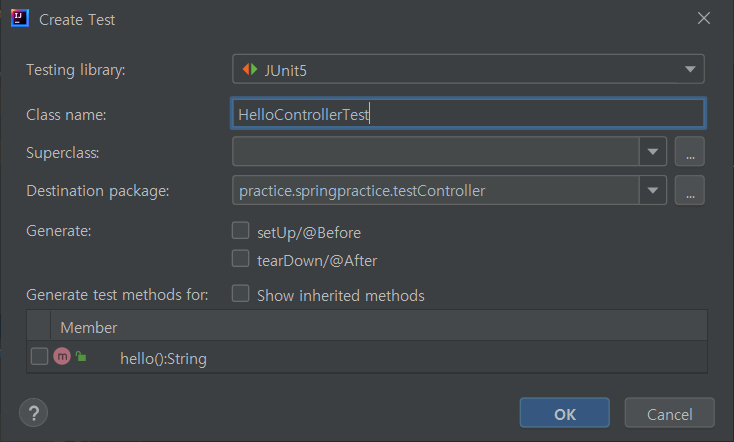
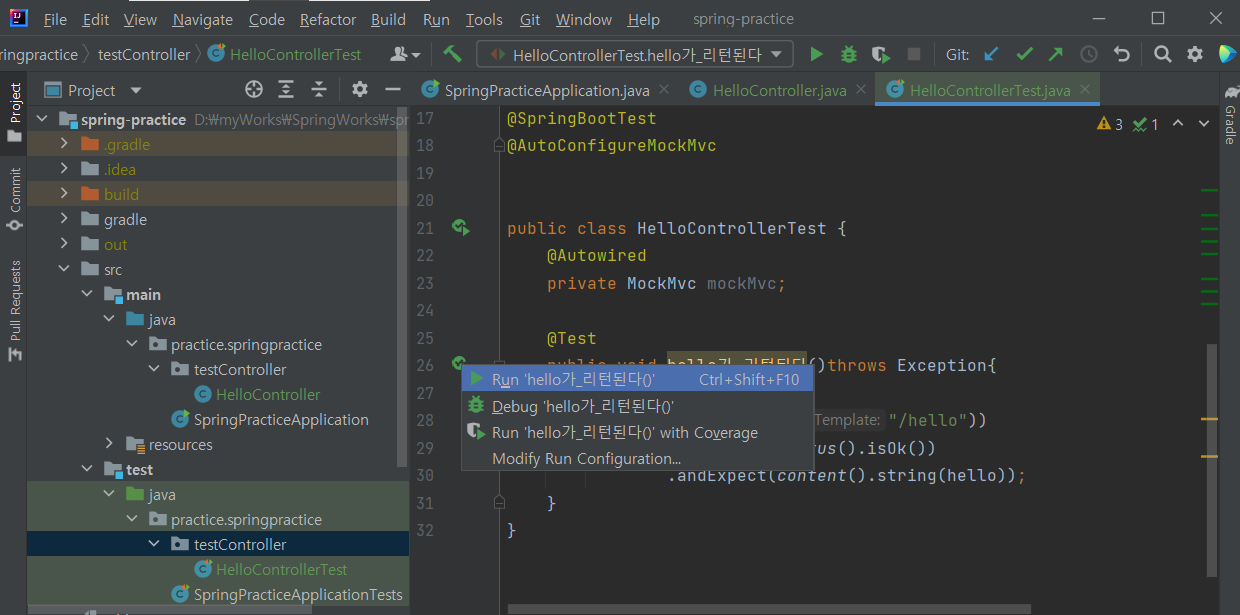
1. 클래스명에 마우스를 올린 채로 Alt + Enter를 누르고 Create Test 클릭
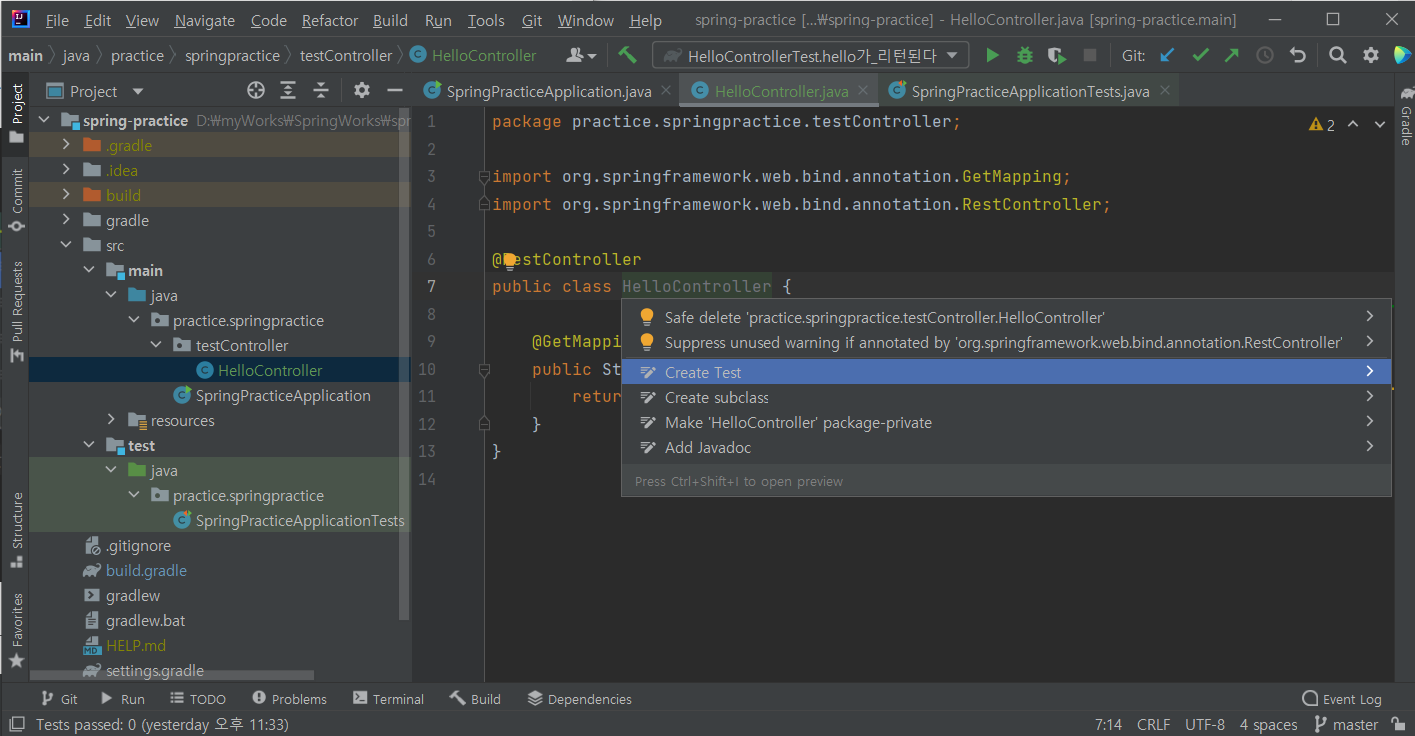
2. 다음과 같은 창이 뜨면 OK를 눌러 테스트 클래스를 생성한다
일반적으로 테스트 클래스는 대상 클래스명에 Test를 붙인 이름으로 한다
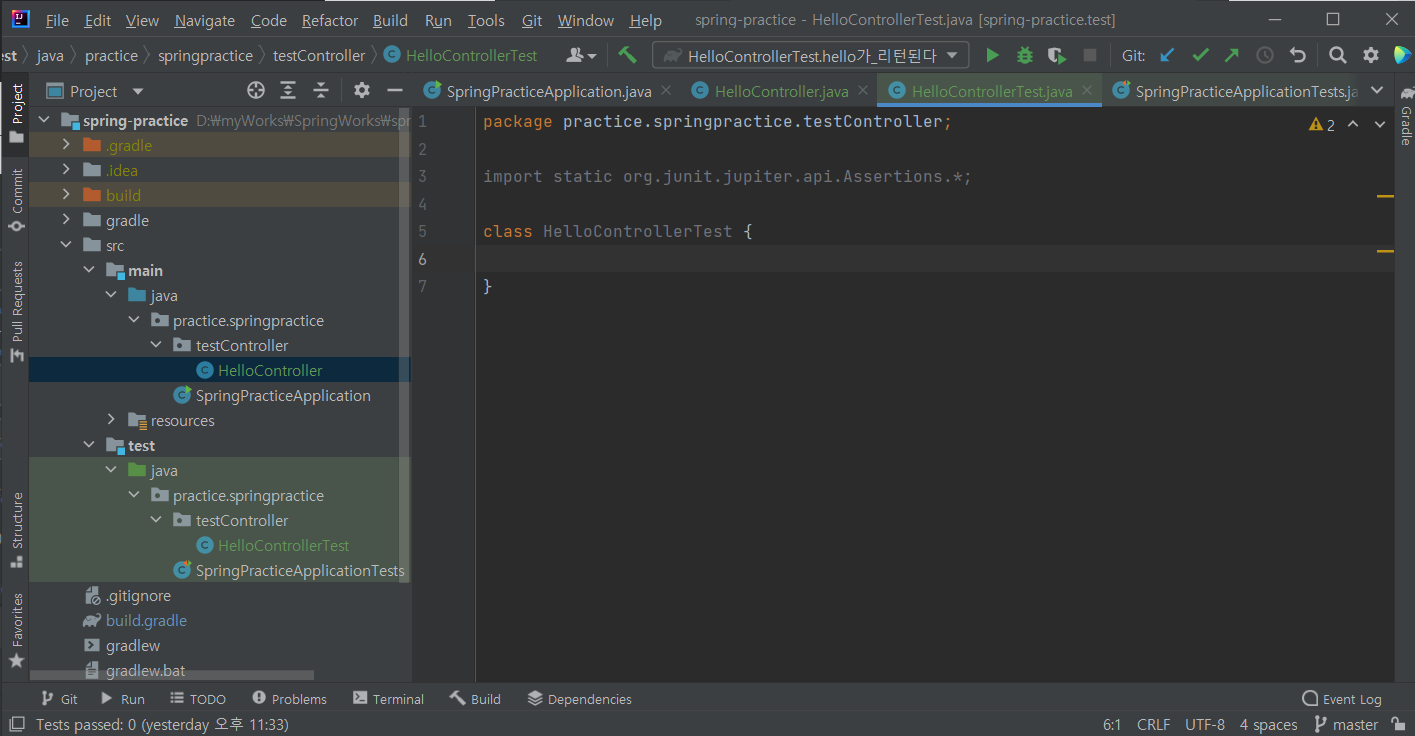
다음과 같이 테스트 클래스가 생성되었다!
3. 다음과 같은 테스트 코드를 추가한다
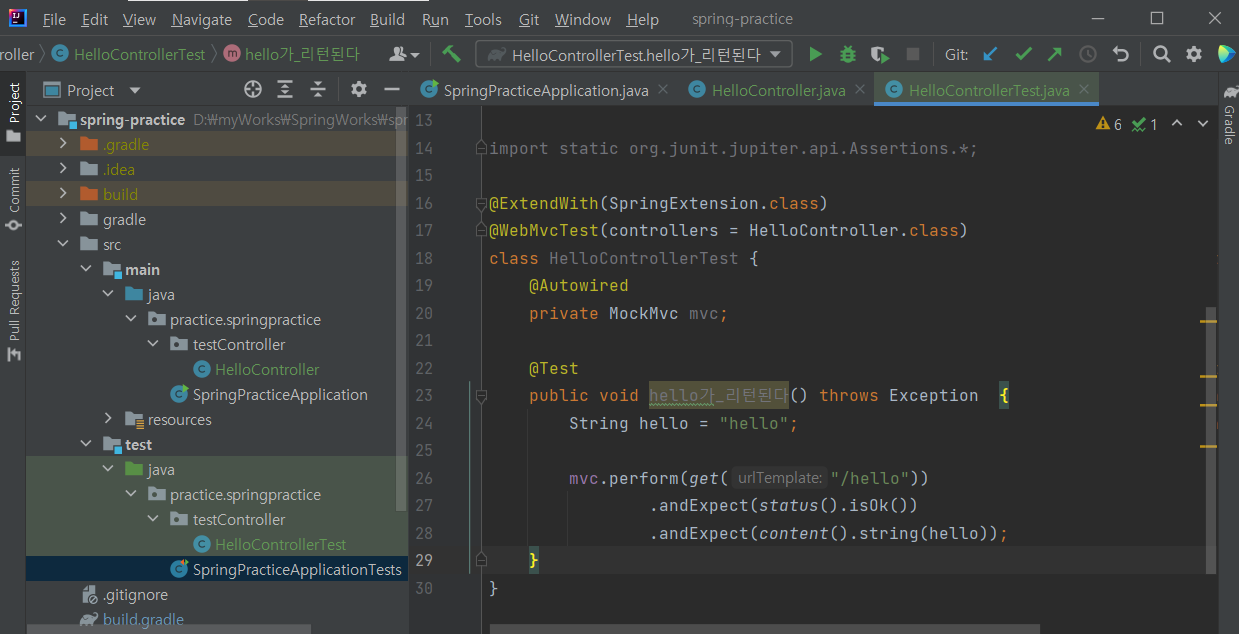
package practice.springpractice.testController;

import org.junit.Test;
import org.junit.runner.RunWith;
import org.springframework.beans.factory.annotation.Autowired;

import org.springframework.boot.test.autoconfigure.web.servlet.AutoConfigureMockMvc;
import org.springframework.boot.test.context.SpringBootTest;
import org.springframework.test.context.junit4.SpringRunner;
import org.springframework.test.web.servlet.MockMvc;

import static org.springframework.test.web.servlet.request.MockMvcRequestBuilders.get;
import static org.springframework.test.web.servlet.result.MockMvcResultMatchers.content;
import static org.springframework.test.web.servlet.result.MockMvcResultMatchers.status;

@RunWith(SpringRunner.class)
@SpringBootTest
@AutoConfigureMockMvc


public class HelloControllerTest {
    @Autowired
    private MockMvc mockMvc;

    @Test
    public void hello가_리턴된다()throws Exception{
        String hello="hello";
        mockMvc.perform(get("/hello"))
                .andExpect(status().isOk())
                .andExpect(content().string(hello));
    }
}
@RunWith(SpringRunner.class)👉 테스트 진행 시 JUnit에 내장된 실행자 외에 다른 실행자를 실행시키고, SpringRunner라는 스프링 실행자를 사용한다
👉 즉, 스프링 부트 테스트와 JUnit 사이 연결자 역할을 한다
@Autowired👉 스프링이 관리하는 빈(Bean)을 주입 받는다
private MockMvc mockMvc;👉 웹 API를 테스트할 때 사용하며, 스프링 MVC 테스트의 시작점
👉 이 클래스를 통해 HTTP GET, POST 등에 대한 API 테스트가 가능
mockMvc.perform(get("/hello"))👉 MockMvc를 통해 /hello 주소로 HTTP GET요청을 한다
👉 체이닝이 지원되어 다음에 나오는 여러 검증 기능을 이어 선언할 수 있다
.andExpect(status().isOk())👉 mvc.perform의 결과를 검증
👉 HTTP Header의 Status를 검증, 우리가 흔히 아는 200(OK), 404, 500 등의 상태를 검증한다
.andExpect(content().string(hello))👉 mvc.perform의 결과를 검증
👉 응답 본문의 내용, 즉 Controller에서 "hello"를 리턴하는지 검증
💡 테스트의 메서드명은 어떤 테스트인지 식별하기 쉽기 위해 한글로 작성해주어도 좋다
4. 테스트 메서드명이 한글이면 인식하지 못하는 경우
- 다음과 같이 테스트 메서드명이 한글이면 인식하지 못하는 경우가 발생합니다
- No test found for given includes: [그룹명.프로젝트명.클래스명.테스트클래스명.테스트메소트명] ...

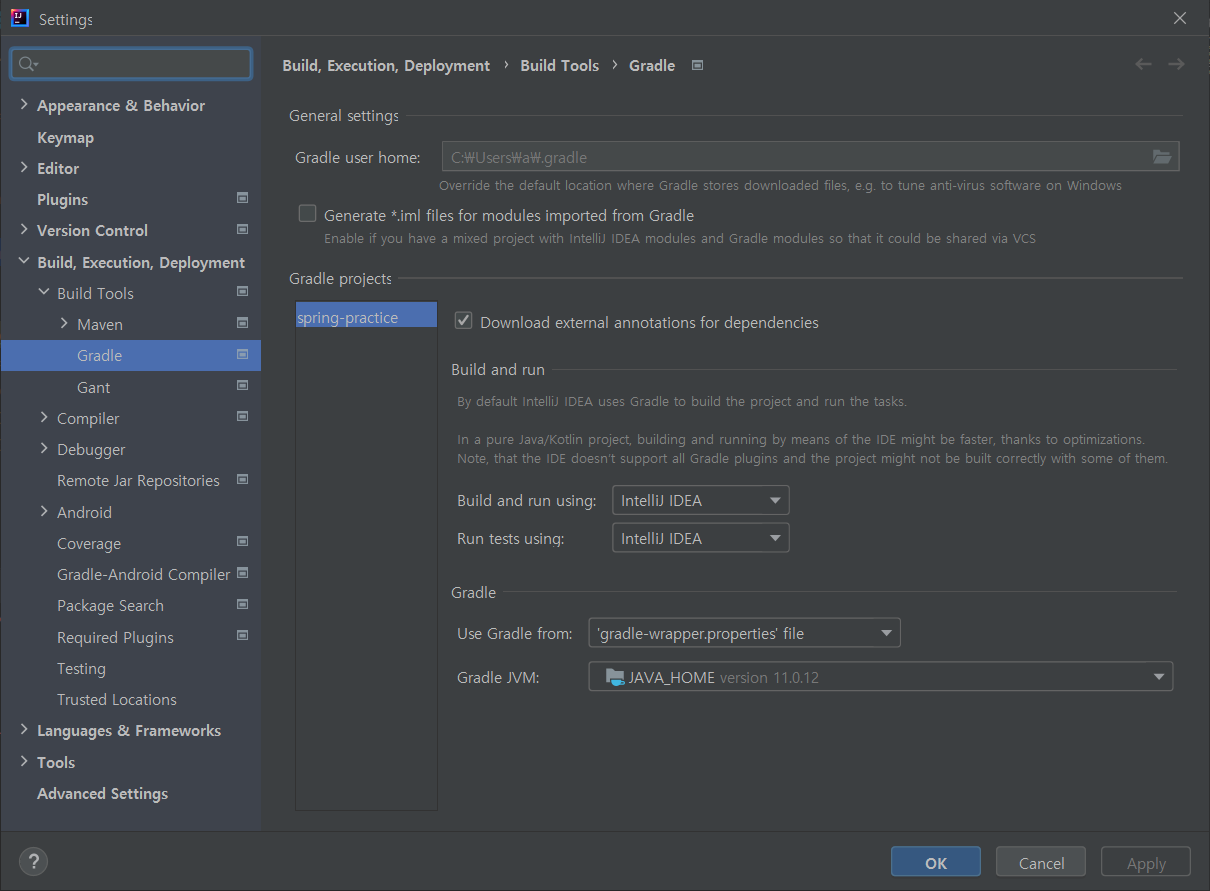
- Gradle Build 설정을 변경하여 해결할 수 있다
Settings > Build, Execution, Deployment > Gradle 에서
Build and run using과 Run tests using을 IntelliJ IDEA로 변경하고
Apply > OK 설정한다
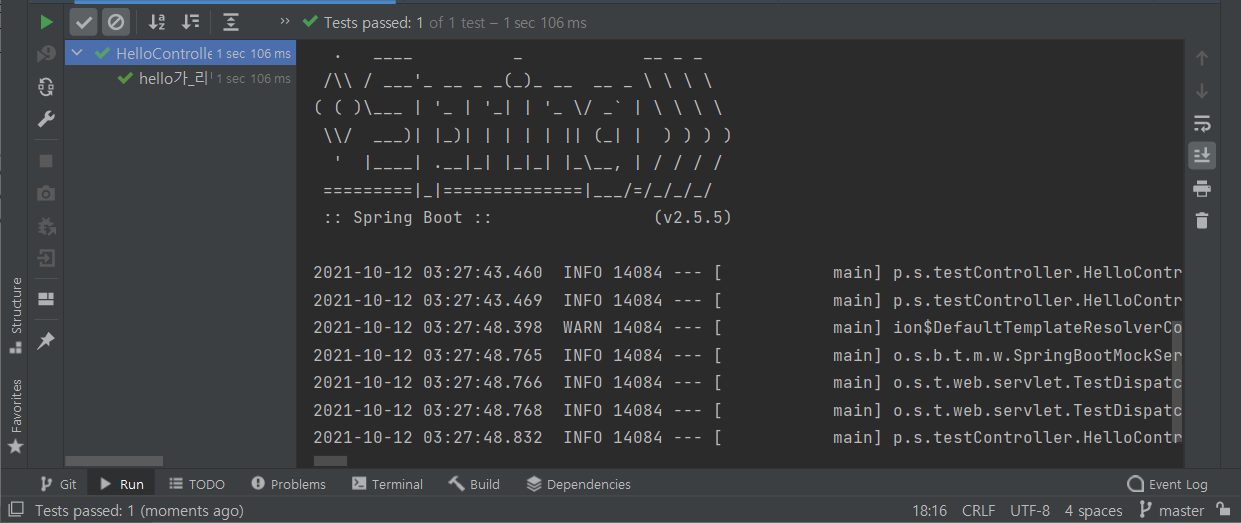
- 다시 실행해보면 결과를 확인할 수 있습니다
결과 확인
- test 함수를 실행했을 때, Test passed를 확인할 수 있다
- main method 실행
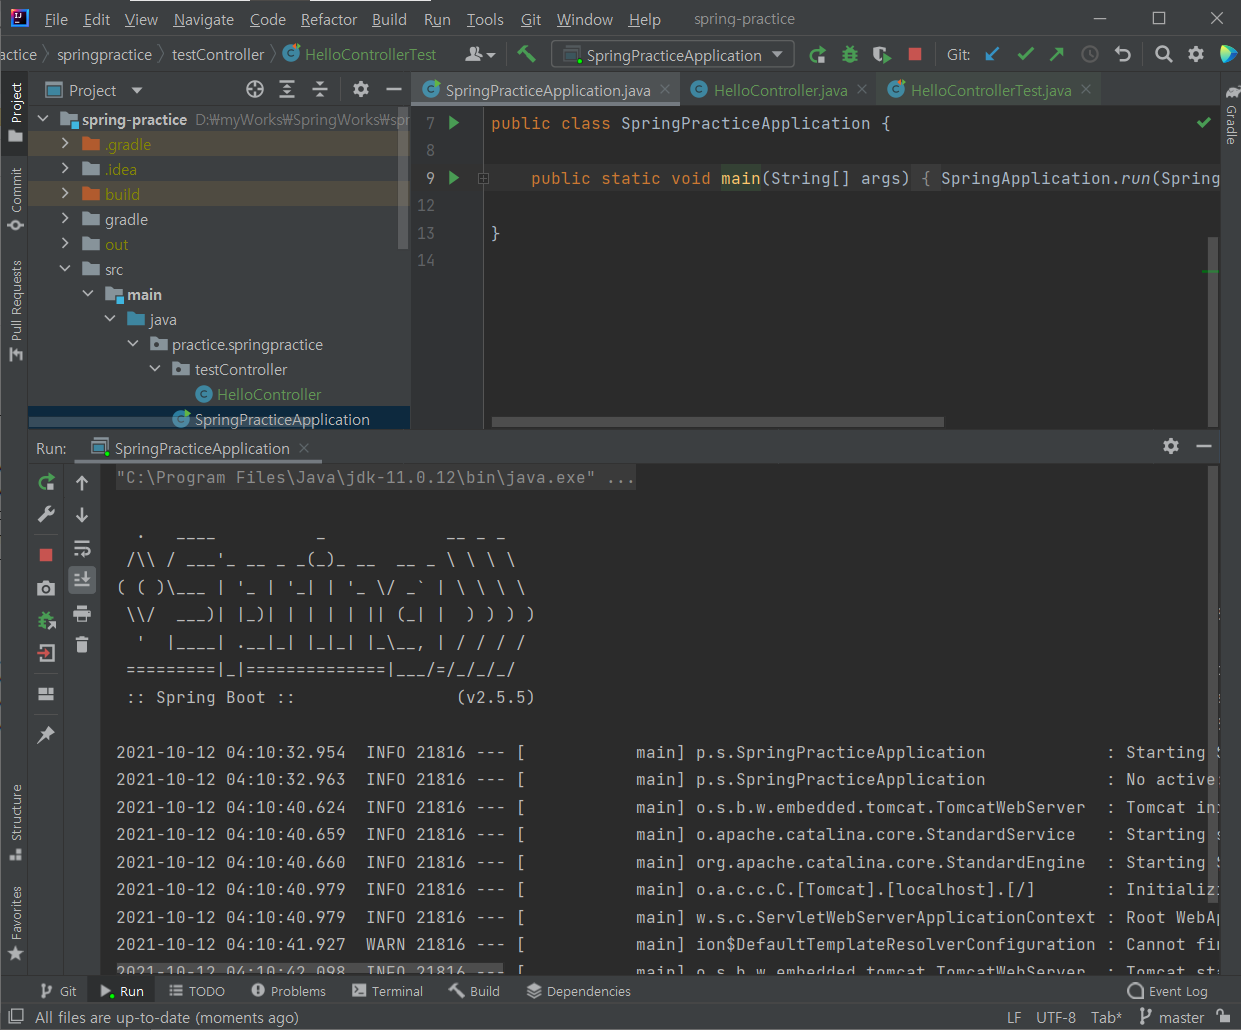
- 웹 브라우저에서 localhost:8080/hello 로 접속하면, 문자열 hello가 노출됨을 확인할 수 있다

⭐ 성공 ⭐
References
📌 https://we1cometomeanings.tistory.com/66
'Web > Spring' 카테고리의 다른 글
| [Spring] 스프링 프로젝트 빌드하고 실행하기 (0) | 2022.01.28 |
|---|---|
| [Spring] 정적 / 템플릿 Welcome Page 만들기 (0) | 2022.01.27 |
| [Spring] 스프링 부트 / 테스트 라이브러리 살펴보기 (0) | 2022.01.27 |
| [Spring] 스프링 프로젝트 생성 / 스트링 부트 스타터, 인텔리제이(IntelliJ)로 스프링 프로젝트 실행 (0) | 2021.08.13 |
| [Spring] 스프링을 시작하며 : 스프링 프레임워크의 개념과 특징, MVC 구조, 스프링 부트 (Spring Framework, Spring MVC, Spring boot) (0) | 2021.08.13 |